iOS Presence SDK Integration Guide
Important 2.7.0 notice:
Certain values have been renamed (since we have unified PSDK objects into PSDK namespace)
- This means if you previously used any of these objects (2.5.0 or earlier), you will now see compiler errors
- It should only take you 5-10 minutes to update these names. Follow this simple migration guide.
Important 2.2.0 notice:
Clear Text Removal: TM will be removing the clear text callbacks from the PSDK for account ID and email address and migrating fully to the token based callback system (You must make a separate request for the member id/email) using the access token. By using tokens that can only be decoded by approved partners, data security will be enhanced. Additionally, with the full migration to Modern Accounts, the token will be providing both the Archtics and HOST Account Information and so clients will be able to fully identify those users in their database.
example, maskedteam member id “teamname.17804314.1852513” will as of PSDK 2.2.0 return as “**.17804314.**”
If you need to fetch additional member information such as email or additional member identifiers using the oAuthToken (token) use the following Archtics API call
GET 'https://auth.ticketmaster.com/api/oauth/token/validate/{token} \
--header 'tm-client-id: {CLIENT_ID}' \
--header 'tm-placement-id: checkout' \
--header 'tm-integrator-id: accounts' \
--header 'x-api-key: {API_KEY}'
Sample Response
{
     "arch_member_id": "teamname.1234.5678",
    "username": "useremail@gmail.com",
    "client_id": "client.integration"
}
Important PSDK 2.1.0 notice:
Experience SDK is now deprecated. Please remove any Experience SDK integrations in place in your app if using PSDK v2.1.0 or greater.
Important PSDK 2.0.0 notice:
A.) Presence SDK 2.0.0+ now requires 2 additional frameworks (bringing the total frameworks to 4):
- Presense.framework (required)
- PresenceSDK.framework (required)
- TicketmasterFoundation.framework (required)
- ResaleSdk.framework (required)
All these files can be found in the Presence SDK distribution zip file.
B. If you are also integrating the Purchase SDK, you will need to use the latest version available here
C. If you are using the latest versions of Xcode 12.3+ you may see an error when compiling: Building for iOS Simulator, but the linked and embedded framework was built for iOS + iOS Simulator. This is a known issue with non-XCFramework files (ie. “fat frameworks”) that we will soon fix. In the meantime, you can simply convert this error to a warning: In your Project’s Build Settings, set “Validate Workspace” to “Yes”
Obtaining the Presence SDK Framework Files
We currently offer two different ways to install the Presence SDK into a project. You can either use CocoaPods or manually load the framework files.
CocoaPods
To integrate PresenceSDK into your Xcode project using CocoaPods, specify it in your Podfile :
Presence SDK v2.23.2 iOS - Swift 5.9.0
pod 'TM-PSDK', '~> 5.9.0-2.23.2'
Manual Download
Download Presence SDK v2.23.2 iOS - Swift 5.9.0.
Demo Project
To get an insight on how to properly integrate the Presence SDK in your app or need help with a step below, you may download and reference this demo project.
What You Need
To integrate Presence SDK in your application, you will need the latest release of the Presence SDK for iOS.
Requirements for using Swift build
- To build, you must use Xcode 12.0+ and the iOS 12+ SDK
Requirements for using Swift 5.9.0 build
- To build, you must use Xcode 12.0+ and the iOS 12+ SDK
General Requirements
- Only Portrait Orientation Supported.
- iPhone support only.
- Minimum iOS 12.0, supported through iOS 15.x
- Offline Ticket Mode, which allows fans to access their tickets without a network connection, also requires that the app be accessible offline.
- Beta versions of Xcode and swift are not supported.
Importing The SDK
Follow these simple steps to integrate and configure the SDK.
Note: If using CocoaPods, you can skip step 1.
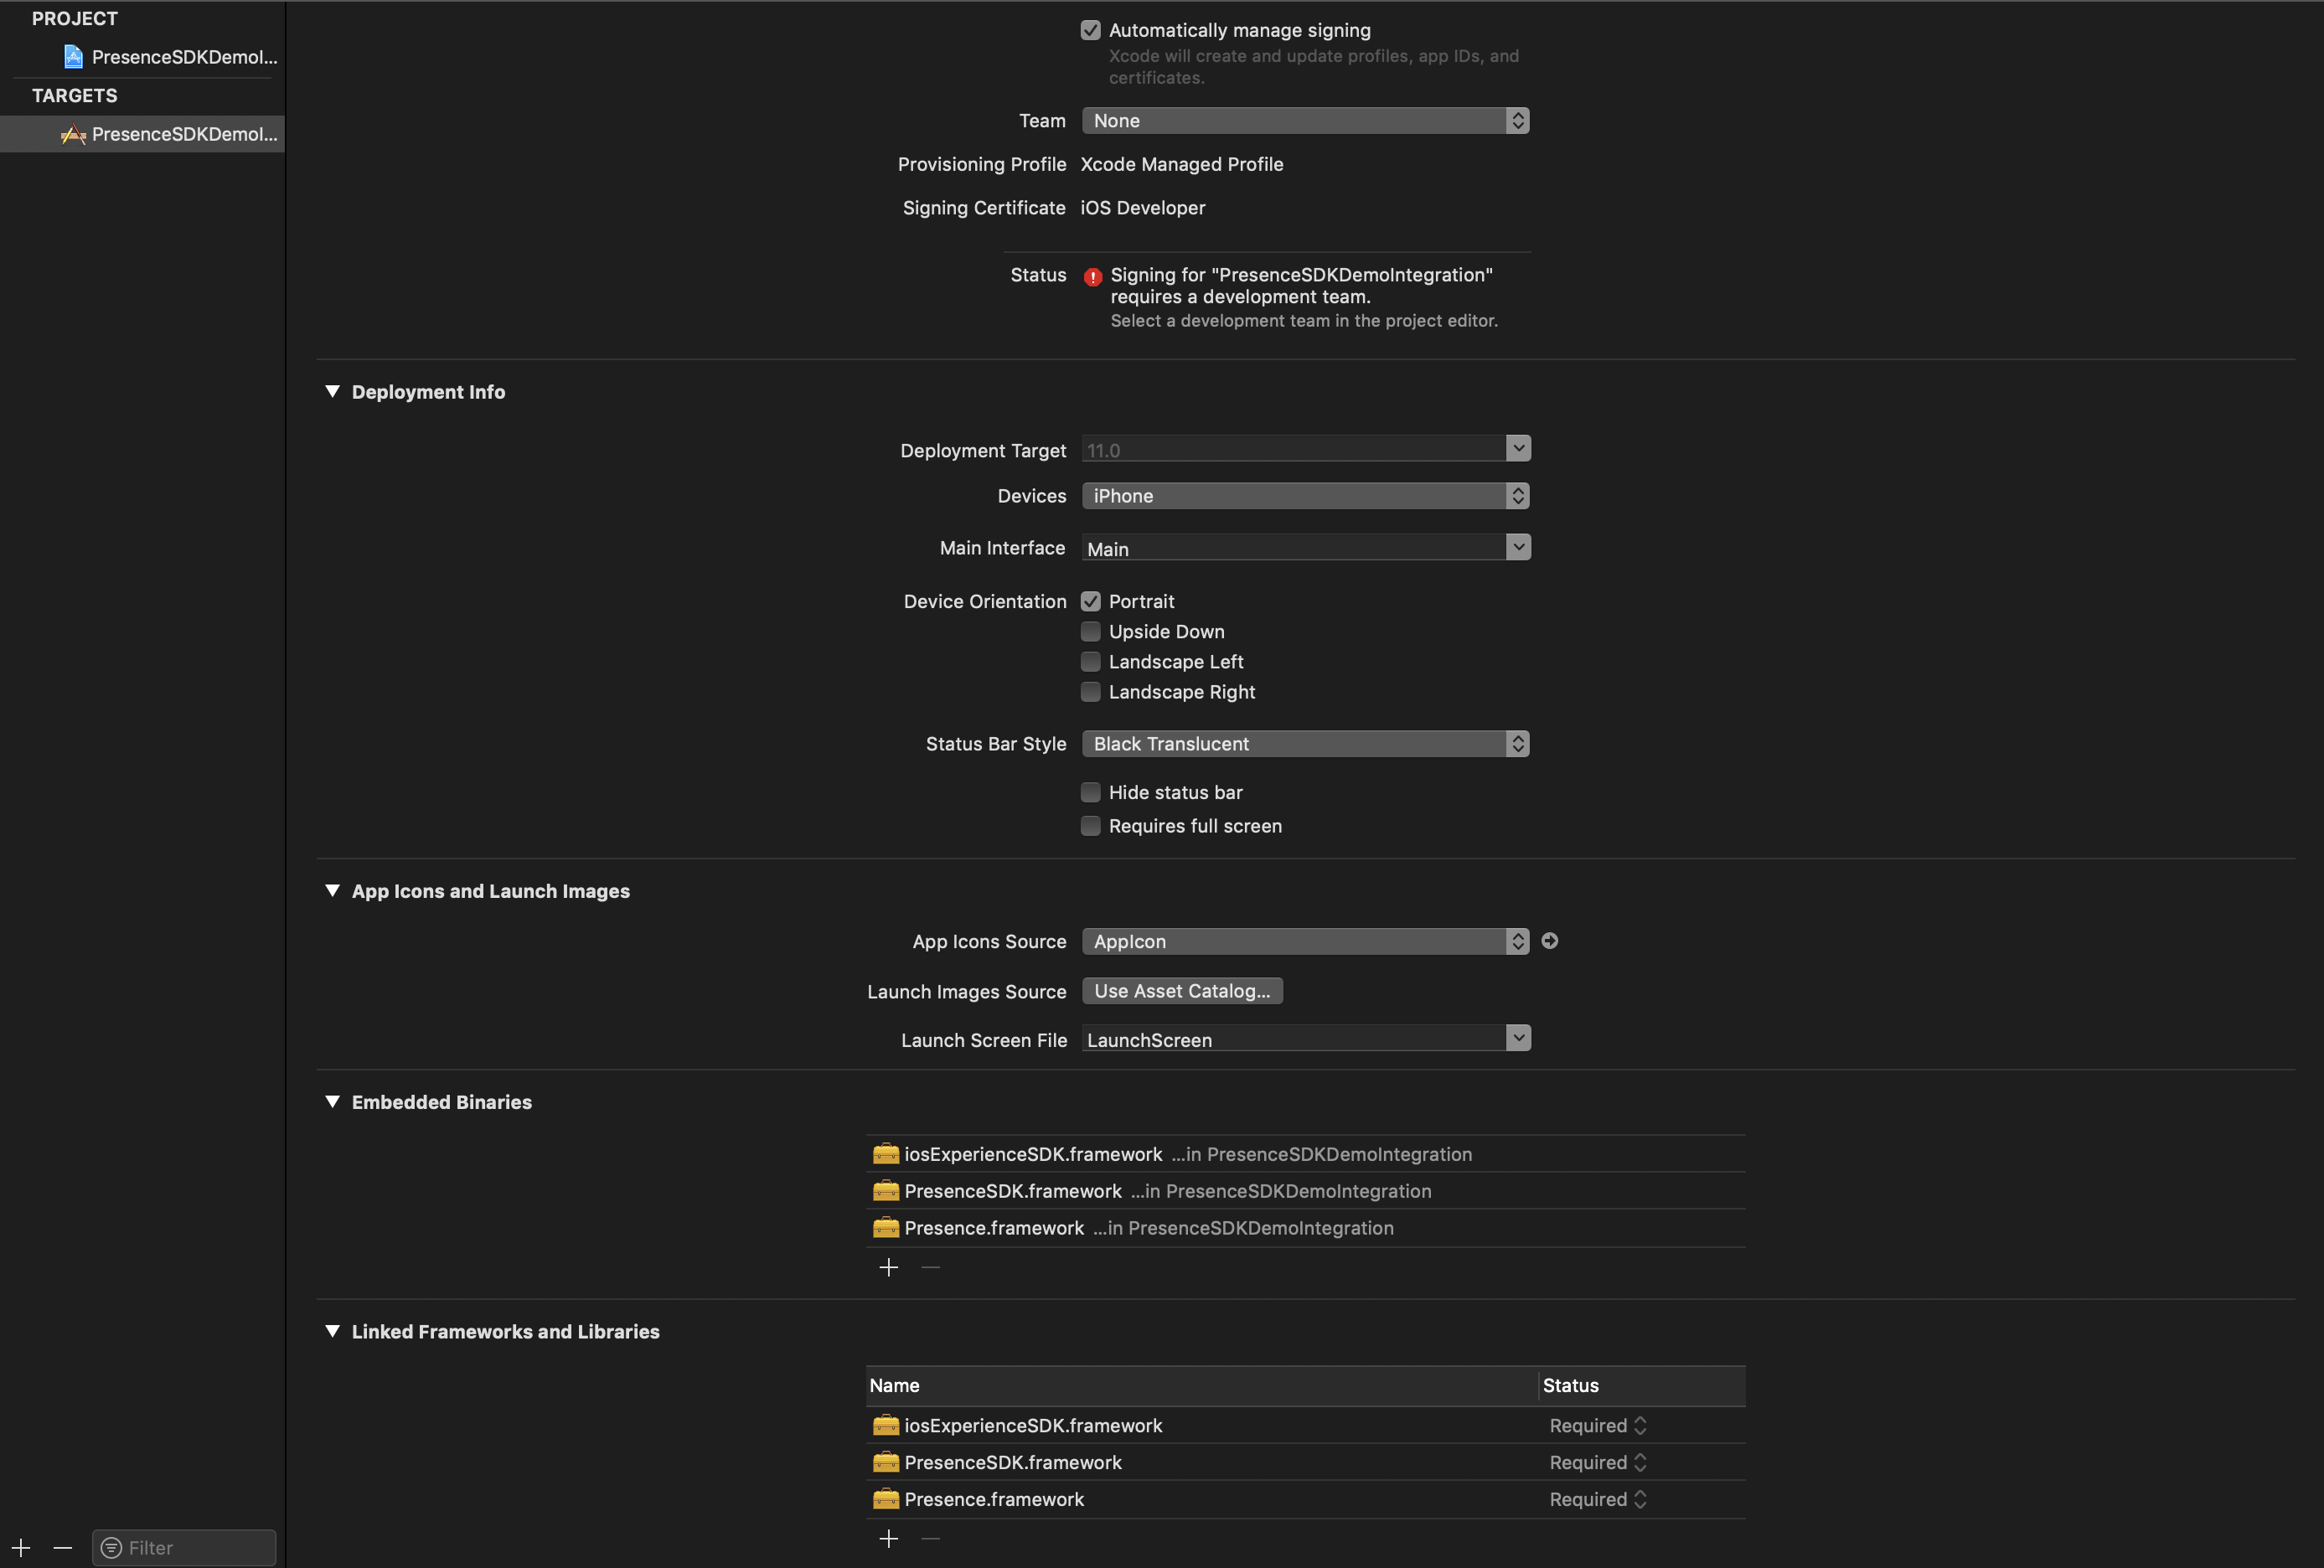
Step 1: Drag and drop the PresenceSDK.framework, iOSExperienceSDK.framework, and Presence.framework into your project’s General -> Embedded Binaries settings (copy items if needed) (Skip step if using Cocoapods)
Step 2: Go to your app’s AppDelegate file and import the PresenceSDK module. You may delete the line where UIKit is being imported if you like. In the PresenceSDK module, UIKit is already being imported for you.
import PresenceSDK //Import this moduleStep 3: Create a configurePresenceSDK() method inside your AppDelegate class. In this method, the account credentials and branding color will be configured.
func configurePresenceSDK() {
	//If you are a team use the following method to configure Presence SDK
	PresenceSDK.getPresenceSDK().setConfig(
		consumerKey: #consumer_key provided on dev portal,
		displayName: #your_team_display_name,
		useNewAccountsManager: #true/false for choosing between new or old account manager, by default it will choose old accounts manager
		quickLogin: #true/false for using the new consolidated "quick" login,
		autoLogin: #true/false for presenting the login flow as soon the new quick login page appears
	)

	//If you are not a team and just going to login in Ticketmaster account than use the following method to configure Presence SDK
	PresenceSDK.getPresenceSDK().setConfig(consumerKey: #consumer_key provided on dev portal)

	//Configure your branding colors for the SDK
	PresenceSDK.getPresenceSDK().setBrandingColors(
		BrandingColors(navBarColor: navbarUIColor,
					  ticketColor: ticketUIColor,
					  buttonColor: buttonUIColor)
	)
}Note: To get consumer key please create an account on https://developer.ticketmaster.com and register your app and it will generate a consumer key that can be used in the above method. Before you can use Presence SDK you will have to provide the generated consumer key together with consumer secret and redirect URI to Presence SDK support team so we can configure your app on our end!
Step 4: Call the configurePresenceSDK() method in the application(: didFinishLaunchWithOptions:) function.
func application(_ application: UIApplication,
  didFinishLaunchingWithOptions launchOptions: [UIApplicationLaunchOptionsKey: Any]?) -> Bool {
  // Override point for customization after application launch.
  configurePresenceSDK()
  return true
}
Setting Up the Views
Now that we’ve imported the SDK into your project we can set up the views to display the UI.
Setup PresenceSDKView
In your storyboard, create a UIViewController or you may use the preset one provided by XCode when a new project is created. This UIViewController will be the starting point for Presence SDK.
Step 1: Drag and drop a UIView from the Object Library (located in the Utility panel) inside this UIViewController. For this UIView, in the Identity Inspector, change the class to PresenceSDKView and Module to PresenceSDK. Finally, set the constraints to the UIView to the edges of the View Controller.
Step 2: You will need to allow the user to logout in some fashion. We recommend using a UIBarButtonItem on the top right corner of the Navigation Item (see example below), but this is not required. You just need to reference the PresenceSDK.getPresenceSDK().logOut() method wherever you want to call the log out function. Please note that the .logout() call will log out both Host and Archtics accounts. Please see the Logout Methods section below under iOS Presence SDK Reference Guide lower on this screen for more information on logout functionality.
Example Logout Functionality: Like the UIView from step 1, drag and drop a UIBarButtonItem onto the Navigation Item of the View Controller. If the View Controller doesn’t have a Navigation item, you may drag and drop from the Object Library before adding a UIBarButtonItem. Double click the UIBarButtonItem’s title and type in “Logout”.

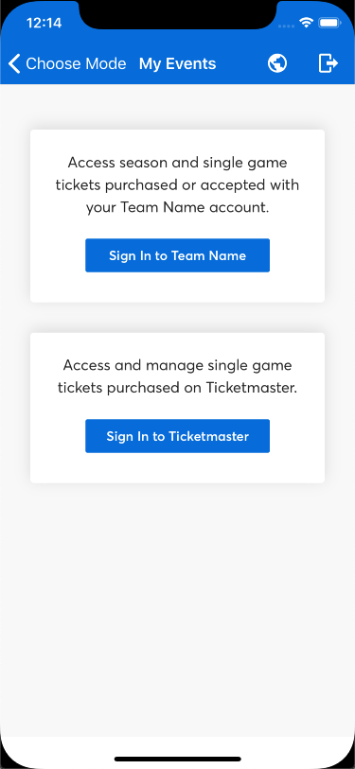
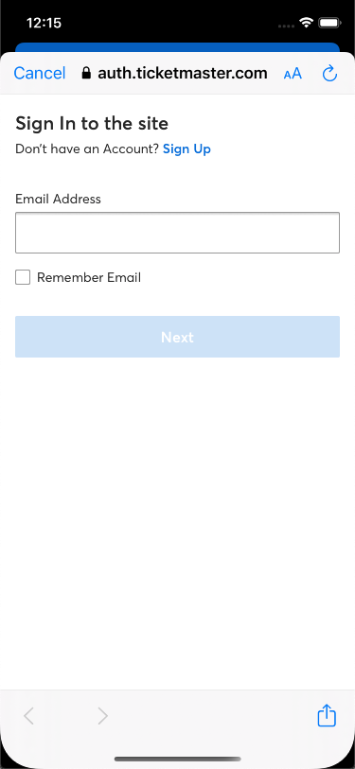
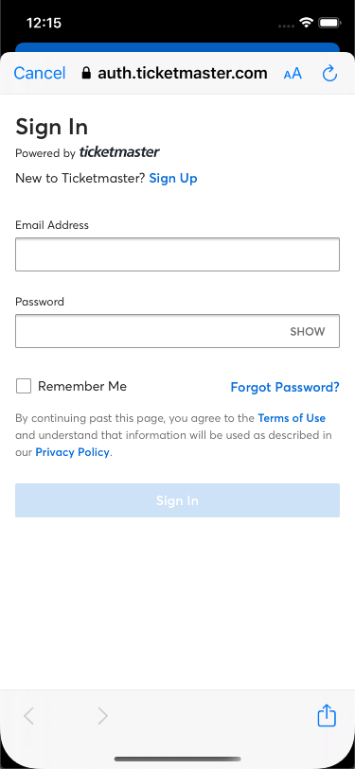
You may now run the application and if you have provided correct configuration, you will see a similar screen to the image below at startup.
IMPORTANT: If your project is in Objective-C, you will get a run time fatal error:
dyld: Library not loaded: @rpath/libswiftContacts.dylib
  Referenced from: */Frameworks/PresenceSDK.framework/PresenceSDK
  Reason: image not found
. To fix this error, in your project build settings, set YES for Always Embed Swift Standard Libraries under Build Options.
NOTE: Further setup required. You still need to configure your application to handle PresenceSDK events.
Configuring Your ViewController
Note: This is a basic example for configuring the ViewController
Step 3: Import the PresenceSDK module. Again, UIKit is imported automatically when importing PresenceSDK, so if you like, you may delete the import UIKit code-line.
import PresenceSDKStep 4: Create an IBOutlet to the UIView you setup in step 1. When the outlet is created, please make sure the view is of type PresenceSDKView. Make sure that you connect this new outlet to the PresenceSDKView in the storyboard. If you used our example logout, remember to also, create an IBAction method called logout for the UIBarButtonItem you setup in step 2. In the method logout, call the logOut method in the PresenceSDK.
//Connect your PresenceSDKView here
@IBOutlet weak var presenceSDKView: PresenceSDKView? = nil
let presenceSDK: PSDK = PSDK.getPresenceSDK()

...
//Only add if you followed our example logout flow.
@IBAction func logout(_ sender: UIBarButtonItem) {
  // class variable: let presenceSDK: PSDK = PSDK.getPresenceSDK()
  presenceSDK.logOut()
}
Step 5: Conform your ViewController to PresenceLoginDelegate and implement the required and optional protocol methods:
extension ViewController: PresenceLoginDelegate {
  //Mandatory methods that the confirming class has to implement. ----------

  ///Method is invoked if the user granted app access/logged in.
  ///- parameter backendName: Name of the backend this callback event is associated with.
  ///- parameter accessToken: access token returned from the specified backend.
  func onLoginSuccessful(backendName: PresenceLogin.BackendName, accessToken: String)

  ///User dismissed login window via the Cancel button
  ///- parameter backendName: Name of the backend this callback event is associated with.
  func onLoginCancelled(backendName: PresenceLogin.BackendName)

  ///Called when results are returned for a member info request after successful login
  ///- parameter member: PresenceMember object. PresenceMember object is `nil` if login
  ///fails or an error is returned fetching member details.
  func onMemberUpdated(backendName: PresenceLogin.BackendName, member: PresenceMember)

  ///- parameter backendName: Name of the backend this callback event is associated with.
  ///- parameter error: If available, an `NSError` object is returned. Defaults is `nil`.
  func onLoginFailed(backendName: PresenceLogin.BackendName, error: NSError?)

  /// Notify when successfully logged-out from both backends
  func onLogoutAllSuccessful()

  ///Optional Methods ----------

  /// Notify when user clicks on "forgot password" link
  func onLoginForgotPasswordClicked(backendName: PresenceLogin.BackendName)

  /// Notify when all cache is cleared
  func onCacheCleared()

  /// Notify when successfully logged-out
  ///- parameter backendName: Name of the backend this callback event is associated with.
  func onLogoutSuccessful(backendName: PresenceLogin.BackendName)

  /// Notify when something went wrong during logout
  ///- parameter backendName: Name of the backend this callback event is associated with.
  ///- parameter error: Error describing the problem
  func onLogoutFailed(backendName: PresenceLogin.BackendName, error: Swift.Error)

  ///Called when the LoginWindow is made visible to the user.
  onLoginWindowDidDisplay(backendName: PresenceLogin.BackendName)
}
Step 6: Start PresenceSDK inside viewDidLoad() life cycle method.
override func viewDidLoad() {
  super.viewDidLoad()
  // class variable: let presenceSDK: PSDK = PSDK.getPresenceSDK()
  presenceSDK.start(presenceSDKView: presenceSDKView, loginDelegate: self)
}
We’ve also added the ability to start the login flow for specific backend environments. Please see the example below:
//Host Example
presenceSDK.login(to: .host)
//Archtics Example
presenceSDK.login(to: .accountManager)
Step 7: If you need to get information for logged in member, you can use one the protocol methods.
///Called when results are returned for a Member info request after login
///- parameter member: Member object. Member object is `nil` if login fails or an error is returned fetching member details.
func onMemberUpdated(backendName: PresenceLogin.BackendName, member: PresenceMember) {
    print("Member Email: \(member.email)")
    print("Member-Id: \(member.id)")
    print("CCPA Do Not Sell: \(member.doNotSellFlag)")
}
Your ViewController’s implementation should look like this:
import PresenceSDK

class ViewController: UIViewController {

  @IBOutlet weak var presenceSDKView: PresenceSDKView? = nil
  let presenceSDK: PSDK = PSDK.getPresenceSDK()

  override func viewDidLoad() {
    super.viewDidLoad()
    presenceSDK.start(presenceSDKView: presenceSDKView, loginDelegate: self)

  }

  @IBAction func logout(_ sender: UIBarButtonItem) {
    presenceSDK.logOut()
  }
}

extension ViewController: PresenceLoginDelegate{

  func onLoginSuccessful(backendName: PresenceLogin.BackendName, accessToken: String) {
  }

  func onLoginCancelled(backendName: PresenceLogin.BackendName) {
  }

  func onMemberUpdated(backendName: PresenceLogin.BackendName, member: PresenceMember) {
    print("Member Email: \(member.email)")
    print("Member-Id: \(member.id)")
    print("CCPA Do Not Sell: \(member.doNotSellFlag)")
  }

  func onLogoutAllSuccessful() {
  }

  func onLoginFailed(backendName: PresenceLogin.BackendName, error: NSError)
}
You have finish integrating PresenceSDK. Now, you may run the application, if everything was configured properly, you should see your tickets once you log in.
iOS Presence SDK Reference Guide
Jump to Order / Jump to Event
We have revamped our Jump to Order and Jump to Event logic. If event is found for given id, the method opens the list of tickets related to the found event. If order is found for given id, the method opens the list of tickets related to the found order.
//We supply a generic method used to jump to any matching orderID or EventID.
presenceSDK.jumpToOrderOrEvent(id: "12345")

//If you would like to specify only order or event, you can do the following.
presenceSDK.jumpToOrderOrEvent(id: "12345", type: .order)
presenceSDK.jumpToOrderOrEvent(id: "12345", type: .event)

//This will operate the same as the shortened method posted higher up.
presenceSDK.jumpToOrderOrEvent(id: "12345", type: .any)

//The following has been deprecated and will give a warning. We recommend moving to the new methods asap.
presenceSDK.displayOrder(orderId: "12345") //deprecated
//You can specify whether the identifier string you supply is an order id or event id. If you are not sure about identifier type you can search for this identifier both in orders and events. To specify identifier type use value of IdType:
enum IdType: Int {
case event
case order
case any
}Configure Brand Logo
Configure your brand logo with a UIImage object. This image will show up in the linking screen replacing the brand abbreviation. If you do not set a brand logo, then the abbreviation will work like before. Ex: TicketMaster becomes TM.
presenceSDK.setLogo(UIImage.init(named: "teamLogo"))Specifying a Branding Color
Configure your branding color with a UIColor object
// Deprecated API
presenceSDK.setBrandingColor(color: UIColor.blue)

// New API
presenceSDK.setBrandingColors(BrandingColors(oneColor: UIColor.blue))
Configure Team Theme
Configure your team’s theme as SDKTheme.Light (default) or SDKTheme.Dark. The theme configuration lets PresenceSDK
know how to setup various UI elements to contrast with branding color. For example, if branding
color is in the dark color spectrum, a Light theme configuration will color various UI elements white.
This will allow crucial UI element to be visible to the user.
/**
Method for configuring Team Apps theme color in PresenceSDK. This theme color will be used
on various UI elements of the SDK to provide a custom look for Team apps.

- Parameters:
- theme: Theme to be used in the SDK.
*/
func setTheme(theme: SDKTheme)
Configure Login Item
Because Account Manager’s website only supports Forgot Password OR Create account, we have updated the SDK to do the same to remove confusion for your users. by default if not specified, you will see Forgot Password.
//If you wish to use Create Accounts
PSDK.getPresenceSDK().loginButton = .createAccount
//If you wish to use Forgot Password
PSDK.getPresenceSDK().loginButton = .forgotPassword
Suppress View After Login
Presence SDK gives the ability to allow the user to login, then immediately dismiss the presenceSDKView. All that you need to do is utilize the following PresenceLoginDelegate method which you implemented in step 5:
func onLoginSuccessful(backendName: PresenceLogin.BackendName, accessToken: String) {}Once the user has successfully logged in, you can then dismiss or hide the presenceSDKView for later viewing at your leisure.
Note: onLoginSuccessful gets called for each account that is logged in. So in the instance of having a team and host account logged in, the onLoginSuccessful delegate method will be fired off twice.
Logout Methods
Following methods are provided for logging out of the Presence SDK. Logout is now asynchronous so
it is recommended to use the completion handlers or PresenceLoginDelegate methods for notification
about logout completion.
//To logout from both Host and Archtics with an optional completion handler
PSDK.getPresenceSDK().logOut(
  completion: { (_ hostSuccess: Bool, _ hostError: Swift.Error?, _teamSuccess: Bool, _ teamError: Swift.Error?) in
    print("`logOut` called")
  }
)

//To logout from Ticketmaster Account with optional success and failure handlers
PSDK.getPresenceSDK().logOutHost(
  success: {
    print("`logOutHost` succeeded")
  },
  failure: { (_ error: Swift.Error) in
    print("`logOutHost` failed")
  }
)

//To logout from Account Manager with optional success and failure handlers
PSDK.getPresenceSDK().logOutTeam(
  success: {
    print("`logOutTeam` succeeded")
  },
  failure: { (_ error: Swift.Error) in
    print("`logOutTeam` failed")
  }
)
A simple Logout handler function can look like this:
@IBAction func logout(_ sender: UIBarButtonItem) {
  PSDK.getPresenceSDK().logOut(completion: { (hostSuccess, hostError, teamSuccess, teamError) in
    if (hostSuccess) {
      print("Host login was successful")
    }
  })
}Note: Please note that a fan’s tickets will no longer be available on the device for offline viewing if logout is called, as it will clear the cache.
Check Login Status
Presence SDK also provides some helper methods for checking if user is logged into any of the supported services.
// Method to check if user is logged in any of the services i.e Host or Account
// Manager and has a valid access token available.
PSDK.getPresenceSDK().isLoggedIn()

// Method to check if user is logged in Host and has a valid access token available.
PSDK.getPresenceSDK().isLoggedIntoHost()

// Method to check if user is logged in Accounts Manager and has a valid access token available.
PSDK.getPresenceSDK().isLoggedIntoTeam()
Global Methods
  // This method returns version number of the SDK as a String.
  func getVersionNumber() -> String

  /**
  Method for getting a valid OAUTH Access Token

  - Parameters:
  - backendName: Token for Host or AccountManager
  - success: This block will be called when a valid token is fetched
    successfully, the success block will provide a valid access token.
  - failure: This block will be called when there is some error fetching the
    token, the failure block will provide an error object. */
  func getAccessToken(backendName: PresenceLogin.BackendName,
                          success: @escaping AccessTokenSuccessCompletionHandler,
                          failure: @escaping AccessTokenFailureCompletionHandler)
Venue Concession Integration
Presence SDK can now present a Venue Concessions upsell module right inside the Tickets page. Simply implement the two PresenceVenueDelegate methods:
/**
1. Method is invoked upon opening an Event

- Task: fetch and return Venue SDK Identifier

- Parameters:
- identifier: venue identifier (from Ticketmaster)
- completion:
  - sdkIdentifier: venue identifier (from venue concessions SDK)
  - error: an error occured */
func venueConcessionsSdkIdentifier(forIdentifier identifier: String, completion: @escaping (_ sdkIdentifier: String?, _ error: Error?) -> Void) {
  // If your app integrates with venue concessions, return that SDK's venue `sdkIdentifier`
  // For example, VenueNextSDK calls this `sdkIdentifier` an "instance"
  completion("bucks", nil)
}

/**
2. Method is invoked when the user presses a Venue Concessions button

- Parameters:
- identifier: Identifier of the venue (from Ticketmaster)
- sdkIdentifier: Identifier of the venue (from venue concessions SDK)
- concessionsButtonPressed: User pressed `Orders` or `Wallet` button */
func venue(identifier: String, sdkIdentifier: String, concessionsButtonPressed: PSDK.VenueConcessionsButtonType) {
  // Initialize Venue Concessions SDK for the given Venue `sdkIdentifier`. For example:
  VenueNextWeb.shared.initialize("<ORGANIZATION_NAME>", instance: sdkIdentifier)

  // Present proper UI for given button. For example:
  navigationController?.pushFnB() // VenueNextSDK
}
Analytics
Presence SDK provides support for tracking user activity via its Analytics module.
For tracking user activity in the Presence SDK a separate class PresenceEventAnalytics is provided that lists all the user actions that are notified via local notifications together with the payload data.
Notifications - You can observe these notifications to receive updates from Presence SDK.
@objcMembers final public class Action : NSObject {

  /////////////////////////////////////////////////////////////////////////////////////////
  // Notified when all user events are displayed
  // The payload will be nil.
  public static let ACTION_MYTICKETSCREENSHOWED: String

  // Notified when user selects a specific event to via tickets
  // The payload will contain all the mandatory data.
  public static let ACTION_MANAGETICKETSCREENSHOWED: String

  // Notified when user visits the Add Payment Method screen
  // The payload will contain all the mandatory data.
  public static let ACTION_ADDPAYMENTINFOSCREENSHOWED: String

  // Notified when user visits the Barcode screen
  // The payload will contain all the mandatory data.
  public static let ACTION_MYTICKETBARCODESCREENSHOWED: String

  // Notified when user visits the Tickets Detail screen
  // The payload will contain all the mandatory data.
  public static let ACTION_TICKETDETAILSSCREENSHOWED: String


  // Transactional Actions
  /////////////////////////////////////////////////////////////////////////////////////////

  // Notified when user tries to Initiate Ticket Transfer
  // The payload will contain all the mandatory data and will also contain
  // INITIATE_TRANSFER_TICKET_COUNT and INITIATE_TRANSFER_TICKET_FACEVALUE
  public static let ACTION_TRANSFERINITIATED: String

  // Notified when user Cancels a Ticket Transfer
  // The payload will contain all the mandatory data and will also contain
  // CANCEL_TRANSFER_ID
  public static let ACTION_TRANSFERCANCELLED: String

  // Notified when user Post a ticket for Resale
  // The payload will contain all the mandatory data and will also contain
  // INITIATE_RESALE_TICKET_COUNT and INITIATE_RESALE_PRICE
  // Payload will also contain RESALE_BUYER_FEES, RESALE_SELLER_FEES,
  // RESALE_SELLER_PAYOUT and RESALE_ORIGINAL_FACE_VALUE
  public static let ACTION_RESALEINITIATED: String

  // Notified when user Cancels a posted ticket for Resale
  // The payload will contain all the mandatory data and will also contain
  // CANCEL_RESALE_POSTING_ID
  public static let ACTION_RESALECANCELLED: String

  // Notified when user Edit a Posted ticket for Resale
  // The payload will contain all the mandatory data and will also contain
  // UPDATE_RESALE_POSTING_ID and UPDATE_RESALE_PRICE

  // Payload will also contain RESALE_BUYER_FEES, RESALE_SELLER_FEES,
  // RESALE_SELLER_PAYOUT and RESALE_ORIGINAL_FACE_VALUE
  public static let ACTION_RESALEEDITED: String
}
Payload Data for the Notifications – Only relevant information is sent out with the notification.
@objcMembers final public class Data : NSObject {

  // Mandatory Payload Data with all the Notifications
  public static let EVENT_ID: String

  public static let EVENT_NAME: String

  public static let EVENT_DATE: String

  public static let EVENT_IMAGE_URL: String

  public static let VENUE_NAME: String

  public static let VENUE_ID: String

  public static let CURRENT_TICKET_COUNT: String

  public static let ARTIST_NAME: String

  public static let ARTIST_ID: String


  // Notification Specific Payload Data
  public static let INITIATE_TRANSFER_TICKET_COUNT: String

  public static let INITIATE_TRANSFER_TICKET_FACEVALUE: String

  public static let CANCEL_TRANSFER_ID: String

  public static let CANCEL_TRANSFER_ORDER_ID: String

  public static let INITIATE_RESALE_TICKET_COUNT: String

  public static let INITIATE_RESALE_PRICE: String

  public static let UPDATE_RESALE_POSTING_ID: String

  public static let UPDATE_RESALE_PRICE: String

  public static let RESALE_BUYER_FEES: String

  public static let RESALE_ORIGINAL_FACE_VALUE: String

  public static let RESALE_SELLER_PAYOUT: String

  public static let RESALE_SELLER_FEES: String

  public static let CANCEL_RESALE_POSTING_ID: String

  // ActionEvents Notifications
  static public let ACTION_FED_LOGIN_SCREEN_DISMISSED_AFTER_SUCCESS_LOGIN_NO_LINK: String

  static public let ACTION_FED_LOGIN_LINK_ACCOUNTS_SCREEN_SHOWED: String

  static public let ACTION_FED_LOGIN_LINK_ACCOUNTS_SCREEN_DISMISSED: String

  static public let ACTION_GAME_DAY_MODAL_SHOWED: String

  static public let ACTION_GAME_DAY_FLOW_REJECTED: String

  static public let ACTION_GAME_DAY_FLOW_ACCEPTED: String

  static public let ACTION_FED_LOGIN_NO_THANKS_BUTTON_PRESSED: String

  static public let ACTION_FED_LOGIN_LINK_ACCOUNTS_BUTTON_PRESSED: String

  static public let ACTION_ADD_TO_WALLET_INITIATE: String

  static public let ACTION_ADD_TO_WALLET_CANCEL: String

  static public let ACTION_ADD_TO_WALLET_FINISH: String

}
Analytics Usage
If you want to track ACTION_MANAGETICKETSCREENSHOWED event you should add an observer inside your ViewController’s viewDidLoad() method like this:
override func viewDidLoad() {
  super.viewDidLoad()

  NotificationCenter.default.addObserver(self, selector: #selector(self.ticketsScreenShown),
    name: NSNotification.Name(rawValue:PresenceEventAnalytics.Action.ACTION_MANAGETICKETSCREENSHOWED),
    object: nil)
}
And the notification handler will look something like this:
@objc func ticketsScreenShown(_ notification: Notification) {
  let eventId = notification.userInfo?[PresenceEventAnalytics.Data.EVENT_ID] ?? ""
  let eventName = notification.userInfo?[PresenceEventAnalytics.Data.EVENT_NAME] ?? ""
  print("Event_Id: \(eventId), Event_Name: \(eventName)")
}
Release
Following section describes the steps you need to follow to prepare your app for the App Store.
PresenceSDK is packaged as a Universal binary and it contains binary packages for all valid architectures including ARMv* and x86. This is great for development as you can run your app on both devices and simulators but for App Store submission you need to strip the simulator packages from your App. To do this we have provided “strip_frameworks.sh” file, just add this file to the Run Script phase under your app’s Build Phases settings and it will do the work for you. Here is a screenshot of what your Build phases will look like after adding this file:
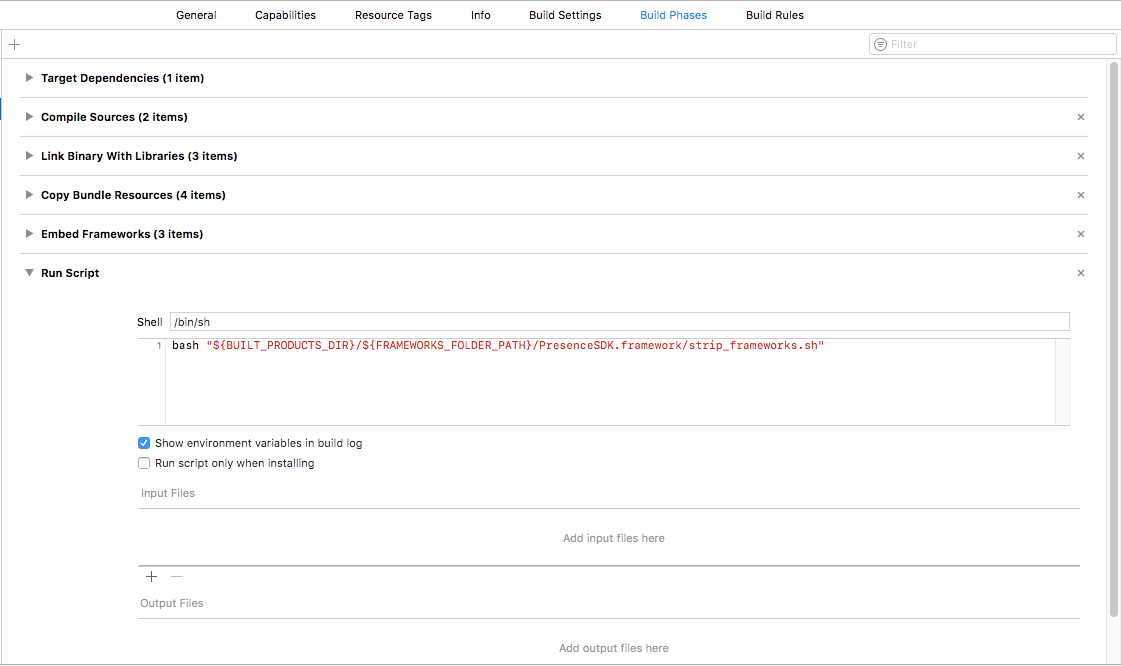
#For your copy and paste needs
bash "${BUILT_PRODUCTS_DIR}/${FRAMEWORKS_FOLDER_PATH}/PresenceSDK.framework/strip_frameworks.sh"