PRESENCE SDK iOS
Documentation
Download Quick Start Guide (NEW!)
Download Presence Demo App Integration Source Code
Download Presence SDK 2.7.0+ Migration Guide
Download Presence SDK iOS integration guide (OLD)
Change log
Changes (10/11/2021 Release 2.5.0)
- Tickets page can now scroll vertically in order to view additional modules (like upsell)
- Added Venue Concessions upsell module (see PresenceVenueDelegate)
- Added Help/Action bar button on Tickets page (see PresenceOrderDelegate)
- Tickets page now presents as fullScreen in iOS 14+
- Fixed issues when compiling with Xcode 13
Changes (08/17/2021 Release 2.3.1)
- Added presentLoginUI option to getAccessToken (to fetch OAuth tokens without triggering login)
- Fixed Refresh token issue while using Quick Login
- Fixed Archtics Cancel Transfer issue
- Fixed crash with missing localization file
Changes (07/30/2021 Release 2.2.2)
- Fixed Host tickets not displaying while using Quick Login
Changes (06/25/2021 Release 2.2.1)
- Fix for displaying an Order with only some tickets transferred
Changes (06/09/2021 Release 2.2.0)
- QuickLogin (and AutoLogin) functionality (aka. Consolidated Sign-In)
- Member ID masking (aka. Clear Text Removal)
Changes (03/15/2021 Release 2.1.0)
- Support for Health Check enabled events
- Remove Experience SDK
Changes (02/02/2021 Release 2.0.0)
- Accessibility Improvements
- Improved versioning for all future releases
- 1.x.x - Major - Required as soon as possible - Possible Integration Changes - Many New Features, New UI (Modern Accounts, SafeTix, Accessibility, New Year)
- x.1.x - Minor - Encouraged as soon as possible - Backwards Compatible Changes - One Major New Feature, Collection of Bug Fixes
- x.x.1 - Patch - Optional as time allows - Background Improvements - Small Bug Fixes, Technical Maintenance
Changes (10/16/17 Release 1.2.0)
- Added support for entering verification code for linking TMR account for Archtics.
- Fixed seat description selection for posting flow for Archtics.
- Separated the login flow from main SDK so it can just be used for login and fetching valid access token.
Changes (10/5/17 Release 1.1.1)
- Added support for choosing between different payout methods during Resale flow for Archtics.
Changes (09/29/17 Release 1.1.0)
- Added support for Apigee and made integration with SDK much simpler.
- Added support for seat selection in Transfer and Resale flow.
- Added support for pre-fetching Apple Wallet Passes
- Added 3 new helper methods for checking login status
- Fixed few minor issues in the SDK
Changes (09/15/17 Release 1.0.8)
- Switched to XCode 9 and Swift 4.
Changes (09/13/17 Release 1.0.7)
- Fixed couple of issues related to accepting terms of use if user has not accepted it yet.
- Cancel Transfer option is immediately available after initiating a transfer.
- Scan Barcode option is immediately available after canceling transfer if barcode is available.
- Added a configuration parameter in the SDK to select new accounts manager flow for resetting password and creating account on main login screen.
- Added SDK version number on the main login screen.
Changes (09/5/17 Release 1.0.6)
- Fixed the issue related to not able to post multiple tickets for resale at the same time.
- Removed ticket price information from the Ticket Details View since that information is not provided.
- Fixed an issue related to ‘Cancel’ button not appearing on Login screen in some cases.
- Fixed an issue related to automatic scrolling to ticket card which has been successfully posted for resale.
- Fixed the appearance of login button on Events List View when the current logged in account does not have any tickets.
Changes (08/24/17 Release 1.0.5)
- Updated the main login screen and added a button for user to create new account or reset password.
- Fixed a bug related to SDK hanging during the login flow.
Changes (08/22/17 Release 1.0.4)
- Added some safety checks to avoid some crashes during Login flow.
- Handled case for events that don’t have date and have TBD or some date override text.
Changes (08/18/17 Release 1.0.3)
- Fixed issue related to grouping of ticket card when multiple tickets are transferred together.
- Fixed another issue related to missing tickets from Transfer Group Selection View.
Changes (08/17/17 Release 1.0.2)
- Fixed issue related to missing tickets from Transfer Group Selection View.
Changes (08/11/17 Release 1.0.1)
- Added support to Add to Apple Wallet for ticket passes.
- Added support for html tags in Accept Terms of Use screen.
- Fixed couple of bugs while Adding and Editing deposit account.
- Fixed issue related to handling of “Session Expired” error.
What You Need
To integrate the Presence SDK in your application, you will need PresenceSDK.framework
Release Notes
Requirements
- To build, you must use Xcode 12.0+ and the iOS 12.0+ SDK
Whats New?
- Tickets page can now scroll vertically in order to view additional modules (like upsell)
- Added Venue Concessions upsell module (see PresenceVenueDelegate)
- Added Help/Action bar button on Tickets page (see PresenceOrderDelegate)
- Tickets page now presents as fullScreen in iOS 14+
- Fixed issues when compiling with Xcode 13
Integrating and Configuring the SDK
Follow these simple steps to integrate and configure the SDK:
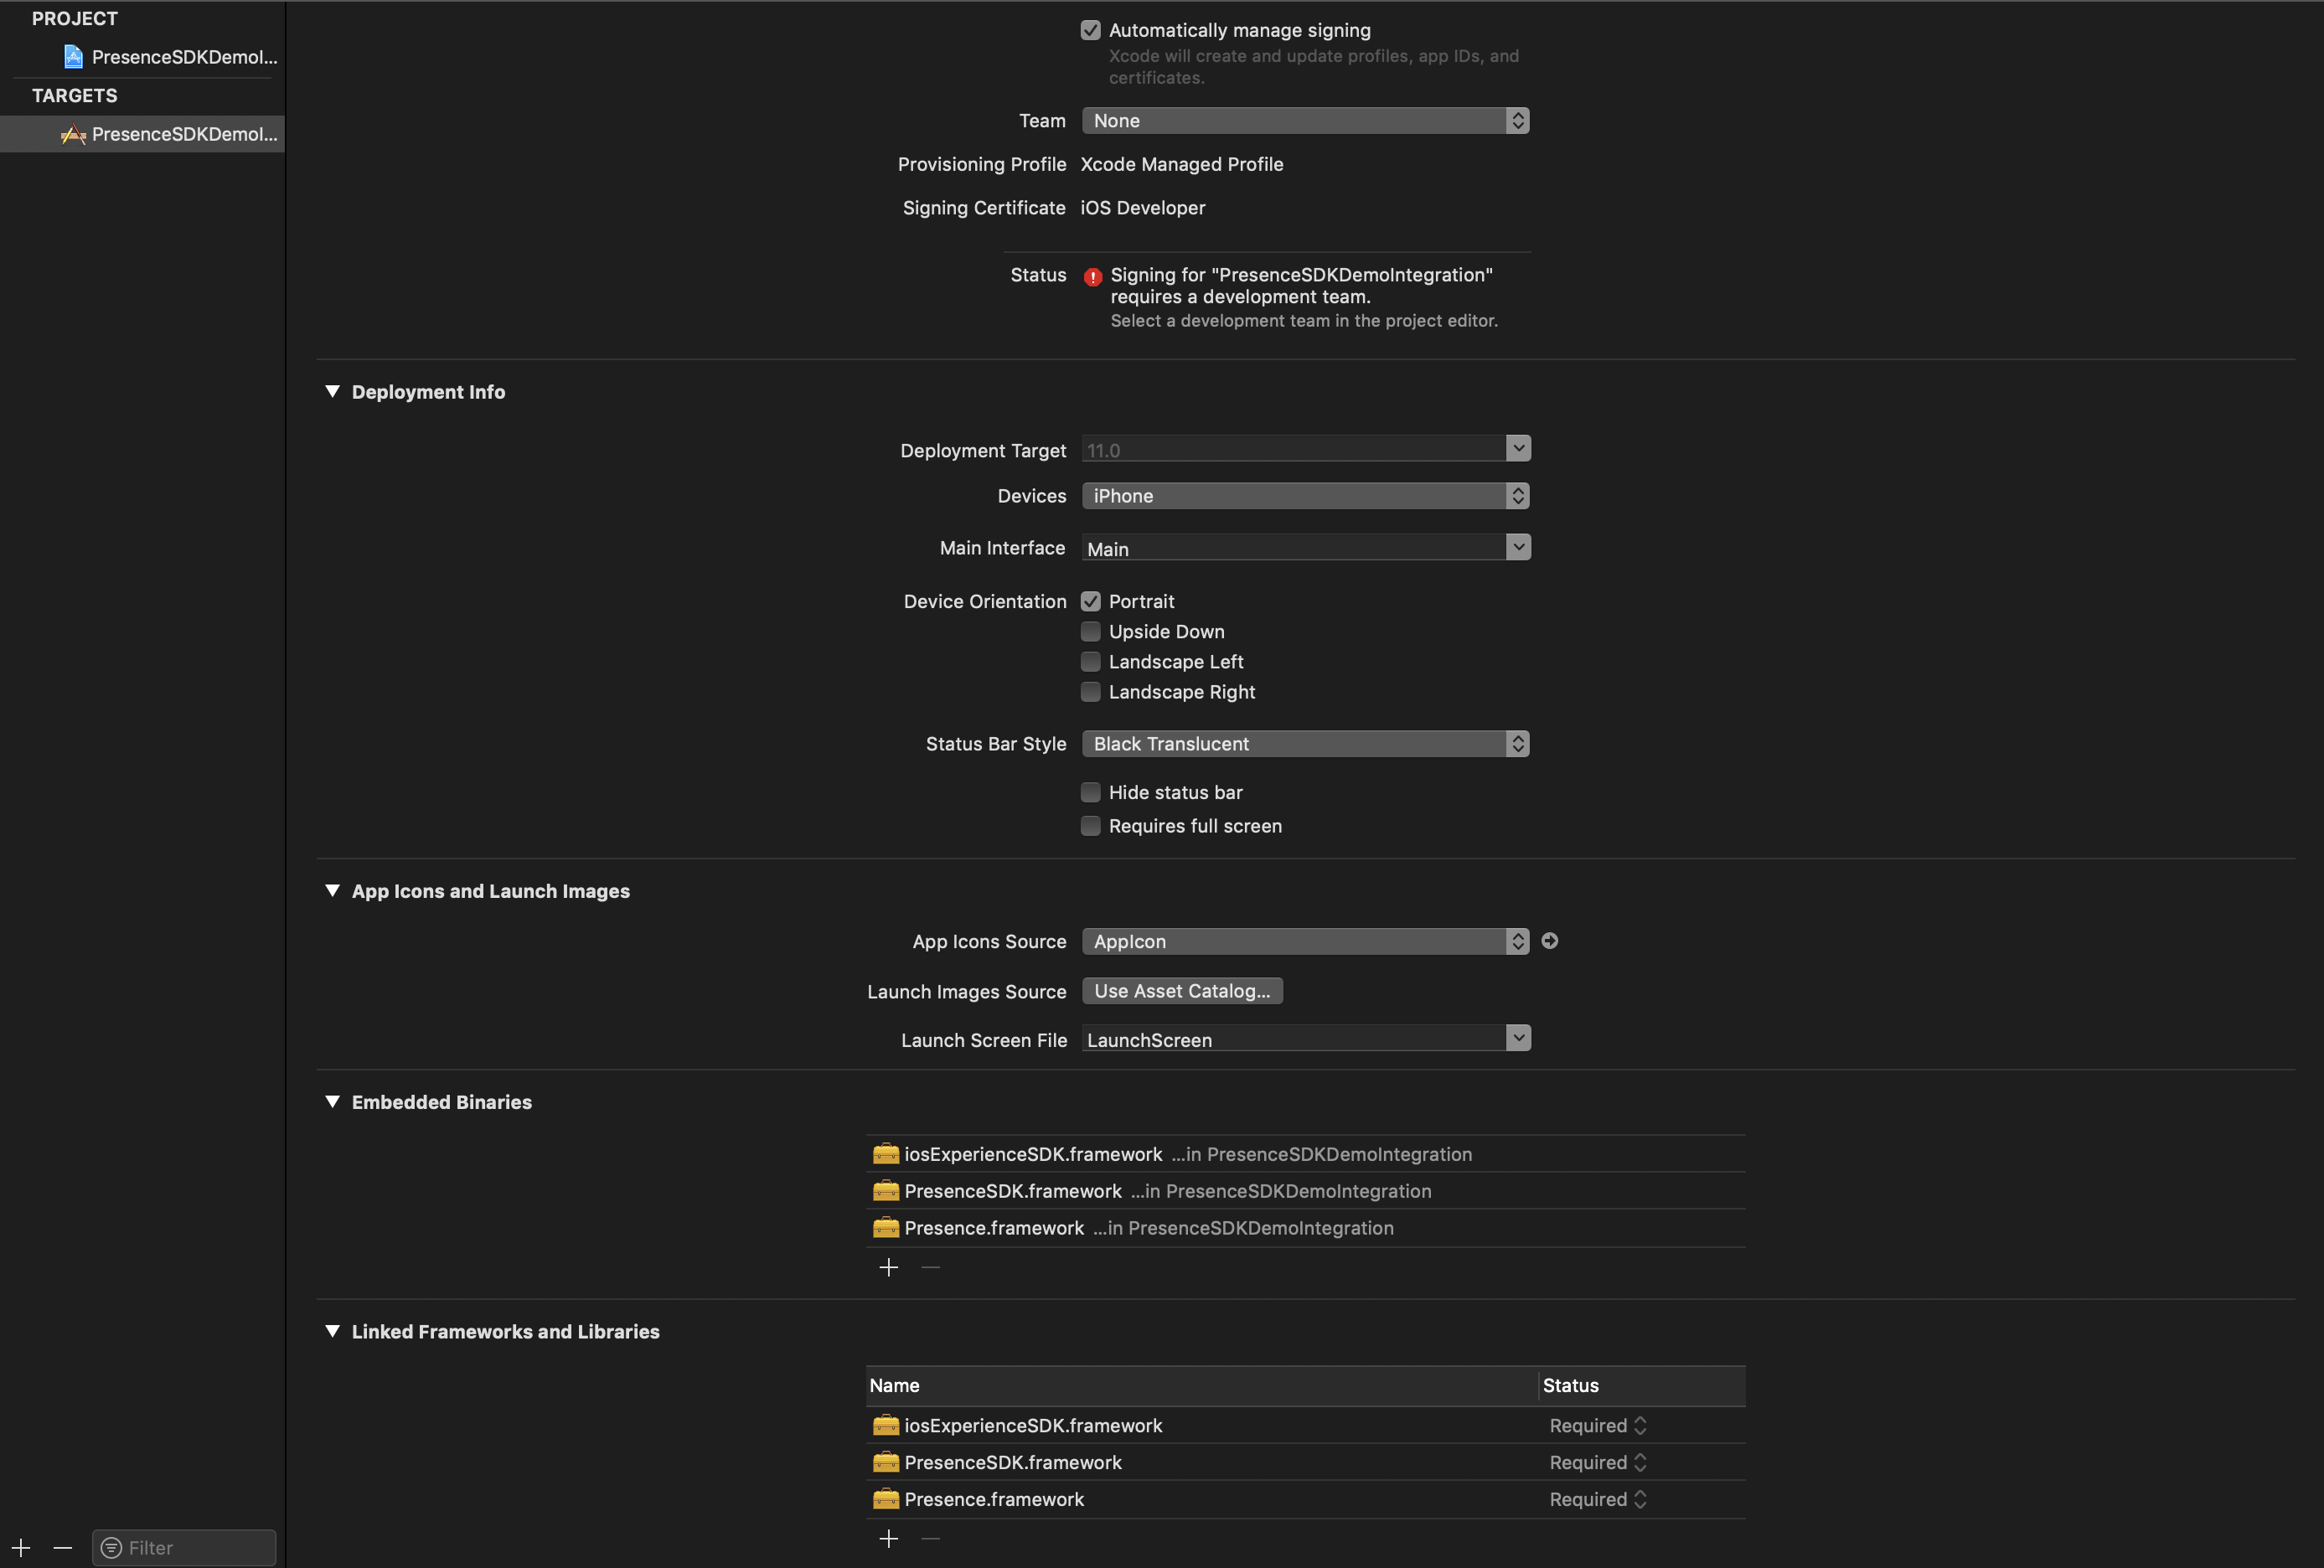
Step 1: Drag and drop the PresenceSDK.framework into your project’s General -> Embedded Binaries settings (copy items if needed)
Step 2: Go to your app’s AppDelegate file and import the PresenceSDK module. You may delete the line where UIKit is being imported if you like. In the PresenceSDK module, UIKit is already being imported for you.
import PresenceSDK //Import this module
Step 3: Create a configurePresenceSDK() method inside your AppDelegate class. In this method, the account credentials and branding color will be configured.
//Swift Version
func configurePresenceSDK() {
	//If you are a team use the following method to configure Presence SDK
	PresenceSDK.getPresenceSDK().setConfig(
		consumerKey: #consumer_key provided on dev portal,
		displayName: #your_team_display_name,
		useNewAccountsManager: #true/false for choosing between new or old account manager, by default it will choose old accounts manager
		quickLogin: #true/false for using the new consolidated "quick" login,
		autoLogin: #true/false for presenting the login flow as soon the new quick login page appears
	)

	//If you are not a team and just going to login in Ticketmaster account than use the following method to configure Presence SDK
	PresenceSDK.getPresenceSDK().setConfig(consumerKey: #consumer_key provided on dev portal)

	//Configure your branding colors for the SDK
	PresenceSDK.getPresenceSDK().setBrandingColors(
		BrandingColors(navBarColor: navbarUIColor,
					  ticketColor: ticketUIColor,
					  buttonColor: buttonUIColor)
	)
}
Note: To get consumer key please create an account on https://developer.ticketmaster.com and register your app and it will generate a consumer key that can be used in the above method. Before you can use Presence SDK you will have to provide the generated consumer key together with consumer secret and redirect URI to Presence SDK support team so we can configure your app on our end!
Step 4: Call the configurePresenceSDK() method in the application(: didFinishLaunchWithOptions:) function.
func application(_ application: UIApplication,
         didFinishLaunchingWithOptions launchOptions: [UIApplicationLaunchOptionsKey: Any]?) -> Bool {
        // Override point for customization after application launch.

        configurePresenceSDK()

        return true
}
In your storyboard, create a UIViewController or you may use the preset one provided by XCode when a new project is created. This UIViewController will be the starting point for Presence SDK.
Step 5: Drag and drop a UIView from the Object Library in the Utility panel inside this UIViewController. For this UIView, change the class to PresenceSDKView and Module as PresenceSDK. Before moving on make sure you set the constraints for this UIView.

If you have provided correct configuration you will see a similar screen at startup when you run the application:

Configuring the ViewController
Note: This is a basic example for configuring the ViewController
Step 1: Import PresenceSDK. Again, UIKit is imported automatically by importing PresenceSDK so if you like, you may delete the import UIKit code-line.
import PresenceSDK
Step 2: Create an outlet to the UIView that is of type PresenceSDKView.
//Connect your PresenceSDKView here
@IBOutlet weak var presenceSDKView: PresenceSDKView? = nil
Step 3: Conform your ViewController to PresenceLoginDelegate and implement the three required protocol functions.
	extension ViewController: PresenceLoginDelegate {
		///- parameter succeeded: Returns `true` if the user granted app access/logged in.
    		///- parameter error: If available, an `NSError` object is returned. Defaults is `nil`.
    		func onLoginWasSuccessful(_ succeeded:Bool, error:NSError?)

    		///User dismissed login window via the Cancel button
    		func onLoginCanceled()

    		///Called when results are returned for a member info request after successful login
///- parameter member: PresenceMember object. PresenceMember object is `nil` if login ///fails or an error is returned fetching member details.
    		func onMemberWasUpdated(_ member: PresenceMember?)
	}
Step 4: Start PresenceSDK inside viewDidLoad() life cycle method.
	override func viewDidLoad() {
        	super.viewDidLoad()

        	PresenceSDK.getPresenceSDK().start(presenceSDKView: presenceSDKView, loginDelegate: self)

    	}
Step 5: If you need to get information for logged in member, you can use one the protocol methods.
	func onMemberWasUpdated(_ member: PresenceMember?) {
        	if let email = member?.emailAddress {
            		print("Member email: \(email)")
        	}
	}
Your ViewController’s implementation should look like this:
import PresenceSDK


class ViewController: UIViewController, PresenceLoginDelegate {

    @IBOutlet weak var presenceSDKView: PresenceSDKView?
    var presenceSDK: PresenceSDK?

    override func viewDidLoad() {
        super.viewDidLoad()
        self.navigationItem.title = NSLocalizedString("My Events", comment: "")
        presenceSDK = PresenceSDK.getPresenceSDK()
        presenceSDK.start(presenceSDKView: presenceSDKView, loginDelegate: self)

    }


    override func viewWillAppear(_ animated: Bool) {
        super.viewWillAppear(animated)

    }

    override func didReceiveMemoryWarning() {
        super.didReceiveMemoryWarning()
        // Dispose of any resources that can be recreated.
    }

    @IBAction func logout(sender: UIButton) {
        presenceSDK.logOut()
    }


    func onLoginSuccessful(_ succeeded:Bool, error:NSError?) {

    }
    //User dismissed login window via the Cancel button
    func onLoginCancelled() {

    }

    ///Called when results are returned for a Member info request after login
    ///- parameter member: Member object. Member object is `nil` if login fails or an error is returned fetching member details.
    func onMemberUpdated(_ member: PresenceMember?) {
        if let email = member?.emailAddress {
            print("Member email: \(email)")
        }
    }
}
This is all you need to integrate the Presence SDK. Now you can run the application and Login into your configured accounts.
Logout Methods
Following methods are provided for logout
//To logout from both Host and Archtics
PresenceSDK.getPresenceSDK().logOut()

//To logout from Ticketmaster Account
PresenceSDK.getPresenceSDK().logOutHost()

//To logout from Account Manager
PresenceSDK.getPresenceSDK().logOutTeam()
A simple Logout handler function can look like this:
@IBAction func logout(sender: UIButton) {
    PresenceSDK.getPresenceSDK().logOut()
}
Check Login Status
Presence SDK also provides some helper methods for checking if user is logged into any of the supported services.
// Method to check if user is logged in any of the services i.e Host or Accounts Manager.
PresenceSDK.getPresenceSDK().isLoggedIn()

// Method to check if user is logged in Host.
PresenceSDK.getPresenceSDK().isLoggedIntoHost()

// Method to check if user is logged in Accounts Manager.
PresenceSDK.getPresenceSDK().isLoggedIntoTeam()
Analytics
For tracking user activity in the Presence SDK a separate class PresenceEventAnalytics is provided that lists all the user actions that are notified via local notifications together with the payload data.
Notifications - You can observe these notifications to receive updates from Presence SDK.
@objcMembers final public class Action : NSObject {

        /////////////////////////////////////////////////////////////////////////////////////////
	 // Notified when all user events are displayed
    	 // The payload will be nil.
        public static let ACTION_MYTICKETSCREENSHOWED: String

	 // Notified when user selects a specific event to via tickets
	 // The payload will contain all the mandatory data.
        public static let ACTION_MANAGETICKETSCREENSHOWED: String

	 // Notified when user visits the Add Payment Method screen
	 // The payload will contain all the mandatory data.
        public static let ACTION_ADDPAYMENTINFOSCREENSHOWED: String

	 // Notified when user visits the Barcode screen
	 // The payload will contain all the mandatory data.
        public static let ACTION_MYTICKETBARCODESCREENSHOWED: String

	 // Notified when user visits the Tickets Detail screen
	 // The payload will contain all the mandatory data.
        public static let ACTION_TICKETDETAILSSCREENSHOWED: String


        // Transactional Actions
        /////////////////////////////////////////////////////////////////////////////////////////

	 // Notified when user tries to Initiate Ticket Transfer
	 // The payload will contain all the mandatory data and will also contain
	 // INITIATE_TRANSFER_TICKET_COUNT and INITIATE_TRANSFER_TICKET_FACEVALUE
        public static let ACTION_TRANSFERINITIATED: String

	 // Notified when user Cancels a Ticket Transfer
	 // The payload will contain all the mandatory data and will also contain
	 // CANCEL_TRANSFER_ID
        public static let ACTION_TRANSFERCANCELLED: String

	 // Notified when user Post a ticket for Resale
	 // The payload will contain all the mandatory data and will also contain
	 // INITIATE_RESALE_TICKET_COUNT and INITIATE_RESALE_PRICE
	 // Payload will also contain RESALE_BUYER_FEES, RESALE_SELLER_FEES,
	 // RESALE_SELLER_PAYOUT and RESALE_ORIGINAL_FACE_VALUE
        public static let ACTION_RESALEINITIATED: String

	 // Notified when user Cancels a posted ticket for Resale
	 // The payload will contain all the mandatory data and will also contain
	 // CANCEL_RESALE_POSTING_ID
        public static let ACTION_RESALECANCELLED: String

 // Notified when user Edit a Posted ticket for Resale
	 // The payload will contain all the mandatory data and will also contain
	 // UPDATE_RESALE_POSTING_ID and UPDATE_RESALE_PRICE

	 // Payload will also contain RESALE_BUYER_FEES, RESALE_SELLER_FEES,
        // RESALE_SELLER_PAYOUT and RESALE_ORIGINAL_FACE_VALUE
        public static let ACTION_RESALEEDITED: String
}
Payload Data for the Notifications – Only relevant information is sent out with the notification.
@objcMembers final public class Data : NSObject {

	 // Mandatory Payload Data with all the Notifications
        public static let EVENT_ID: String

        public static let EVENT_NAME: String

        public static let EVENT_DATE: String

        public static let EVENT_IMAGE_URL: String

        public static let VENUE_NAME: String

        public static let VENUE_ID: String

        public static let CURRENT_TICKET_COUNT: String

        public static let ARTIST_NAME: String

        public static let ARTIST_ID: String


	 // Notification Specific Payload Data
        public static let INITIATE_TRANSFER_TICKET_COUNT: String

        public static let INITIATE_TRANSFER_TICKET_FACEVALUE: String

        public static let CANCEL_TRANSFER_ID: String

        public static let CANCEL_TRANSFER_ORDER_ID: String

        public static let INITIATE_RESALE_TICKET_COUNT: String

        public static let INITIATE_RESALE_PRICE: String

        public static let UPDATE_RESALE_POSTING_ID: String

        public static let UPDATE_RESALE_PRICE: String

        public static let RESALE_BUYER_FEES: String

        public static let RESALE_ORIGINAL_FACE_VALUE: String

        public static let RESALE_SELLER_PAYOUT: String

        public static let RESALE_SELLER_FEES: String

        public static let CANCEL_RESALE_POSTING_ID: String
    }
Analytics Usage
If you want to track ACTION_MANAGETICKETSCREENSHOWED event you should add an observer inside your ViewController’s viewDidLoad() method like this:
override func viewDidLoad() {
   super.viewDidLoad()

   NotificationCenter.default.addObserver(self, selector: #selector(self.ticketsScreenShown),

      					name: NSNotification.Name(rawValue:PresenceEventAnalytics.Action.ACTION_MANAGETICKETSCREENSHOWED),
                                               object: nil)
}
And the notification handler will look something like this:
@objc func ticketsScreenShown(_ notification: Notification) {

        let eventId = notification.userInfo?[PresenceEventAnalytics.Data.EVENT_ID] ?? ""
        let eventName = notification.userInfo?[PresenceEventAnalytics.Data.EVENT_NAME] ?? ""
        print("Event_Id: \(eventId), Event_Name: \(eventName)")
}
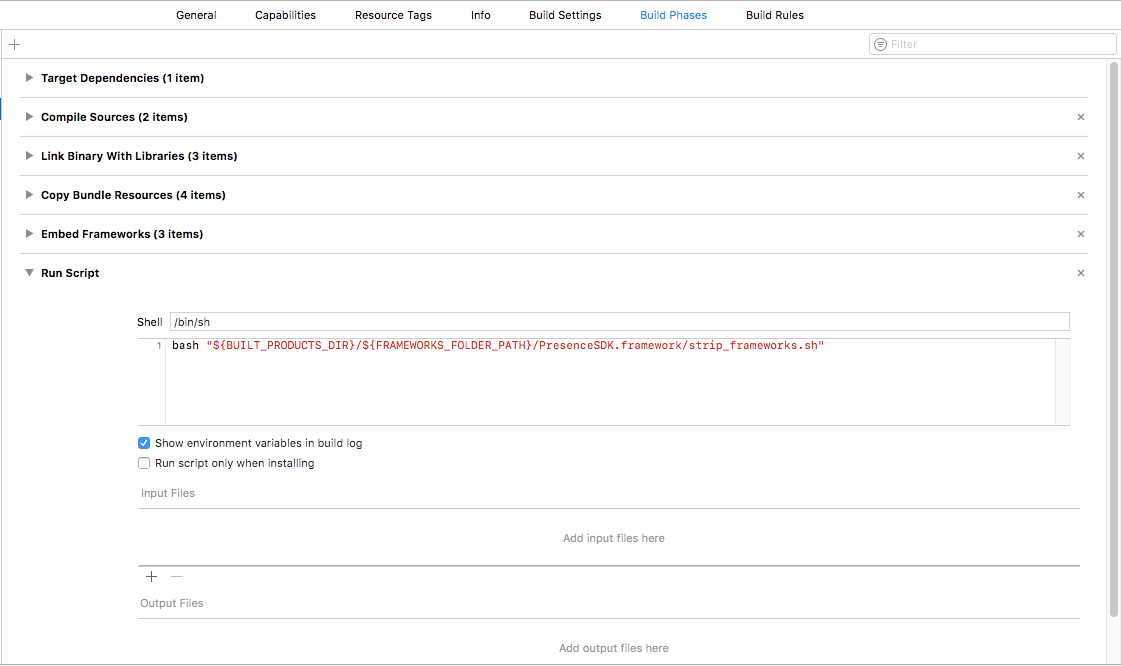
Getting Ready for Apple Store Submission
PresenceSDK is packaged as a Universal binary and it contains binary packages for all valid architectures including ARMv* and x86. This is great for development as you can run your app on both devices and simulators but for App Store submission you need to strip the simulator packages from your App. To do this we have provided “strip_frameworks.sh” file, just add this file to the Run Script phase under your app’s Build Phases settings and it will do the work for you. Here is a screenshot of what your Build phases will look like after adding this file: